구성 : Laravel Framework 8.42.1
들어가기 앞서, JWT, OAuth 의 개념을 알고 있다면 더욱 쉽게 접근 가능 할 것 같다.
2021.05.01 - [보안] - [JWT] JSON Web Token 이란?
2021.05.01 - [보안] - [OAuth] OAuth 2.0 이란?
tymon-jwt 패키지를 이용해 실습해 볼것이다.
https://github.com/tymondesigns/jwt-auth
tymondesigns/jwt-auth 패키지 설치하기
- composer 명령어를 이용해서 tymon/jwt-auth 패키지를 설치한다.
composer require tymon/jwt-auth- publish 명령을 실행한다.
php artisan vendor:publish --provider="Tymon\JWTAuth\Providers\LaravelServiceProvider"config directory에 jwt.php 파일이 생성된다.
- JWT의 서명과 알고리즘에 필요한 secret 값을 생성한다.
php artisan jwt:secret

/* .env 파일에 JWT_SECRET 값이 생성된다.
 * JWT_SECRET=FJWIEOFJIOWEJFWEIJFFFFFFF
 */
User Model 수정
Models\User
<?php

namespace App\Models;

use Illuminate\Contracts\Auth\MustVerifyEmail;
use Illuminate\Database\Eloquent\Factories\HasFactory;
use Illuminate\Foundation\Auth\User as Authenticatable;
use Illuminate\Notifications\Notifiable;
use Tymon\JWTAuth\Contracts\JWTSubject;


class User extends Authenticatable implements JWTSubject {
    use HasFactory, Notifiable;

    /**
     * The attributes that are mass assignable.
     *
     * @var array
     */
    protected $fillable = [
        'name',
        'email',
        'password',
    ];

    /**
     * The attributes that should be hidden for arrays.
     *
     * @var array
     */
    protected $hidden = [
        'password',
        'remember_token',
    ];

    /**
     * The attributes that should be cast to native types.
     *
     * @var array
     */
    protected $casts = [
        'email_verified_at' => 'datetime',
    ];

    /**
     * Get the identifier that will be stored in the subject claim of the JWT.
     *
     * @return mixed
     */
    public function getJWTIdentifier() {
        return $this->getKey();
    }


    /**
     * Return a key value array, containing any custom claims to be added to the JWT.
     *
     * @return array
     */
    public function getJWTCustomClaims() {
        return [];
    }
}
User Model에서 JWTSubject interface의 2가지 메소드( getJWTIdentifier() , getJWTCustomClaims() )를 구현해야
한다.
마이그레이션 실행
php artisan migrate
Auth Guard 수정
config\auth.php
    ...
    'defaults' => [
        'guard' => 'api', // web 에서 api로 수정한다.
        'passwords' => 'users',
    ],

    ...

    'guards' => [
        'web' => [
            'driver' => 'session',
            'provider' => 'users',
        ],

        'api' => [
            'driver' => 'jwt', // token 에서 jwt로 수정한다.
            'provider' => 'users',
            'hash' => false,
        ],
    ],

    ....
기본적으로 내장된 Laravel Auth 에서 jwt/auth를 이용 하는 것이다.
Custom JWT Middleware 작성하기
php artisan make:middleware JwtMiddlewareapp\Http\Middleware\JwtMiddleware
<?php
namespace App\Http\Middleware;

use Closure;
use JWTAuth;
use Exception;
use Tymon\JWTAuth\Http\Middleware\BaseMiddleware;

class JwtMiddleware extends BaseMiddleware {

	/**
	 * Handle an incoming request.
	 *
	 * @param  \Illuminate\Http\Request  $request
	 * @param  \Closure  $next
	 * @return mixed
	 */
	public function handle($request, Closure $next)
	{
		try {
		   $user = JWTAuth::parseToken()->authenticate();
 		} catch (Exception $e) {
            if ($e instanceof \Tymon\JWTAuth\Exceptions\TokenInvalidException) {
		        return response()->json(['status' => 'Token is Invalid'], 403);
		    } else if ($e instanceof \Tymon\JWTAuth\Exceptions\TokenExpiredException) {
			    return response()->json(['status' => 'Token is Expired'], 401);
		    } else if ($e instanceof \Tymon\JWTAuth\Exceptions\TokenBlacklistedException) {
			    return response()->json(['status' => 'Token is Blacklisted'], 400);
		    } else {
		        return response()->json(['status' => 'Authorization Token not found'], 404);
		    }
		}
        return $next($request);
	}
}
Middleware 등록하기
app\Http\Kernel.php
protected $routeMiddleware = [
        .
        .
        .
        'jwt.verify' => \App\Http\Middleware\JwtMiddleware::class,
    ];
AuthController 작성하기
routes\api.php
Route::group([
    'middleware' => 'api',
    'prefix' => 'auth'
], function () {
    Route::post('login', [AuthController::class, 'login']);
    Route::post('logout', [AuthController::class, 'logout']);
    Route::post('refresh', [AuthController::class, 'refresh']);
    Route::post('me', [AuthController::class, 'me']);
    Route::post('register', [AuthController::class, 'register']);

});
php artisan make:controller AuthController
app\Http\Controllers\AuthController
실습을 위해서 서비스로직을 컨트롤러단에서 처리했음!
<?php

namespace App\Http\Controllers;

use Illuminate\Http\Request;
use Illuminate\Support\Facades\Validator;
use Illuminate\Support\Facades\Hash;
use App\Models\User;

class AuthController extends Controller {
    /**
     * Create a new AuthController instance.
     *
     * @return void
     */
    public function __construct() {
        $this->middleware('jwt.verify', ['except' => ['login', 'register']]);
    }

     /**
     * Register new user
     *
     * @param  string $name, $email, $password, password_confirmation
     *
     * @return \Illuminate\Http\JsonResponse
     */
    public function register(Request $request) {

        $validator = Validator::make($request->all(), [
                'name' => 'required|string|max:255',
                'email' => 'required|string|email|max:255|unique:users',
                'password' => 'required|string|min:6|confirmed',
            ]);

        if($validator->fails()){
                return response()->json([
                    'status' => 'error',
                    'success' => false,
                    'error' =>
                    $validator->errors()->toArray()
                ], 400);
            }

        $user = User::create([
                'name' => $request->input('name'),
                'email' => $request->input('email'),
                'password' => Hash::make($request->input('password')),
            ]);

        return response()->json([
            'message' => 'User created.',
            'user' => $user
        ]);
    }


    /**
     * Get a JWT via given credentials.
     *
     * @return \Illuminate\Http\JsonResponse
     */
    public function login() {
        $credentials = request(['email', 'password']);

        if (! $token = auth()->attempt($credentials)) {
            return response()->json(['error' => 'Unauthorized'], 401);
        }
        return $this->respondWithToken($token);
    }


    /**
     * Get the authenticated User.
     *
     * @return \Illuminate\Http\JsonResponse
     */
    public function me() {
        return response()->json(auth()->user());
    }


    /**
     * Log the user out (Invalidate the token).
     *
     * @return \Illuminate\Http\JsonResponse
     */
    public function logout() {
        auth()->logout();
        return response()->json(['message' => 'Successfully logged out']);
    }


    /**
     * Refresh a token.
     *
     * @return \Illuminate\Http\JsonResponse
     */
    public function refresh() {
        return $this->respondWithToken(auth()->refresh());
    }


    /**
     * Get the token array structure.
     *
     * @param  string $token
     *
     * @return \Illuminate\Http\JsonResponse
     */
    protected function respondWithToken($token) {
        return response()->json([
            'access_token' => $token,
            'token_type' => 'bearer',
            'expires_in' => auth()->factory()->getTTL() * 60
        ]);
    }


}
Postman 실습
1. register

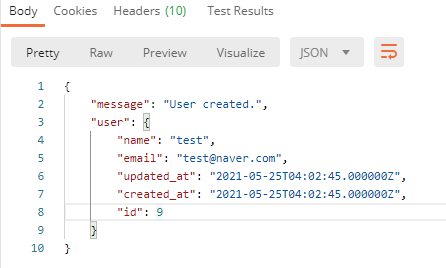
2. login

정상적으로 로그인이 이루어지면 respondWithToken($token) method에 의해 token이 발급된다.

expires_in key값의 경우 TTL(초) 단위 이므로 3600초 = 60분의 유효기간을 가진다.
3. me
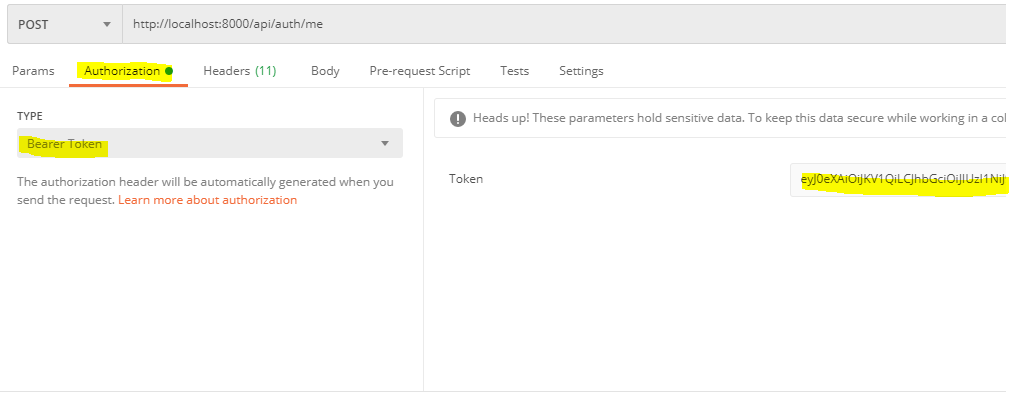
login시 발급받은 token값을 우측 Token값에 넣어준다.

정상적으로 JWT를 통한 API 호출이 되는것을 확인할 수 있다.
다음 포스팅에서는 refresh token을 이용한 토큰 재발급 및 여러모델에서 JWT를 활용하는 방법에 대해서 알아보겠다.
도움이 되셨다면 하트 및 댓글 부탁드립니다♥
출처
https://webdock.io/en/docs/how-guides/laravel-guides/build-api-laravel-json-web-tokens-jwt-part-1
'Framework > Laravel Framework' 카테고리의 다른 글
| [Laravel] Excel Import 사용하기 (0) | 2021.06.16 |
|---|---|
| [Laravel] JWT API Server 구축하기(2) (0) | 2021.05.25 |
| [Laravel] Window10 사용 시 작업 스케줄러 적용하기 (0) | 2021.01.26 |
| [Laravel] Log 사용시 날짜별 파일 저장하기 (0) | 2021.01.06 |
| [Laravel] How to use Laravel response()->json() to return empty object instead of empty array (0) | 2021.01.05 |


댓글